


![]()
Recently I was working on a project to integrate Robolectric, a great Android unit testing framework which doesn’t require an emulator to run. I ran into a few ridiculous issues that I never found documented on the internet, which arose because I am using Gradle and Jenkins and Robolectric all together. I’d like to share them here and save some other poor soul from the head bashing I had to go through. I’m also going to share a few other tips that weren’t as obscure, just to have it all in one place. Yay, let’s get started!
DIRECTORY STRUCTURE
If you were an early adopter of Android Studio, your directory structure might look different than the current default directory structure of Android Studio, pictured here. Robolectric has hard-coded this current directory structure in their code, and there is no way to get around it by gradle. You’ve just got to update your directory structure to the new one.
GRADLE VERION
The most recent version* of the Robolectric Gradle Plugin is 0.13.+, and it uses Gradle 2.0. Gradle 2.0 is currently available in the Android Studio Canary Channel (as of 0.8.11), but Android Studio Beta Channel (currently 0.8.9*) is still using Gradle 1.11. If you are on the Beta Channel, you want to pull in the 0.12.0 plugin, and then update it when you move on to Gradle 2.0. (Sidenote, there is a great blog post here by Larry Schiefer about what to expect when you transition over to Gradle 2.0.)
JAVA VERION
Both Robolectric plugins need Java 1.7 (colloquially, Java 7), so you will need to upgrade this if you aren’t using it already. To upgrade locally, download Java 7 from here. If you’ve set $JAVA_HOME path in your .bash_profile, update that to point at the 7 location. To make sure that Android Studio is building with Java 7 you need to edit the plist, located at /Applications/Android Studio.app/Contents/Info.plist. You will then need to change the XML key JVMVersion to 1.7+. The + means “use the highest available version of Java 7.” You could also use 1.7*, which means “use exactly this version.” More on that over here.
Now you need to upgrade on Jenkins as well. Your admin can create a JDK selector in a build’s config file, so you can toggle between 6 and 7 (and 8) on your build setup. Set it to 7.
SETUP ROBOLECTRIC GRADLE REFERENCES
Now you are ready to setup all the Robolectric references in Gradle. First update your project level build.gradle file (the highest level one, that is at the same level as settings.gradle) to include robolectric as a dependency. Use 0.12.+ or 0.13.+ based on your gradle version as discussed above.
buildscript {
dependencies {
...
classpath 'org.robolectric:robolectric-gradle-plugin:0.12.+'
}
}
Next we need to update the app level build.gradle file. Add the robolectric plugin, androidTestCompile testing frameworks, and the androidTest directory under sourceset. The Google Play Services dependency isn’t required, but I’ve added it to help explain the “V4 support lib issue” in a later section.
apply plugin: 'robolectric'
dependencies {
compile('com.google.android.gms:play-services:5.0.+') {
exclude module: 'support-v4'
}
// Testing frameworks
androidTestCompile 'junit:junit:4.10'
androidTestCompile 'com.squareup:fest-android:1.0.+'
androidTestCompile 'com.google.android:android:+'
androidTestCompile 'org.robolectric:robolectric:2.3'
/* Robolectric relies on this version of v4. Locally we don't need this include, but it is required for Jenkins */
androidTestCompile 'com.android.support:support-v4:19.0.1'
}
android {
...
sourceSets {
androidTest {
setRoot('src/androidTest')
}
}
}
robolectric {
include '**/*Test.class'
}
WRITE A DUMMY TEST
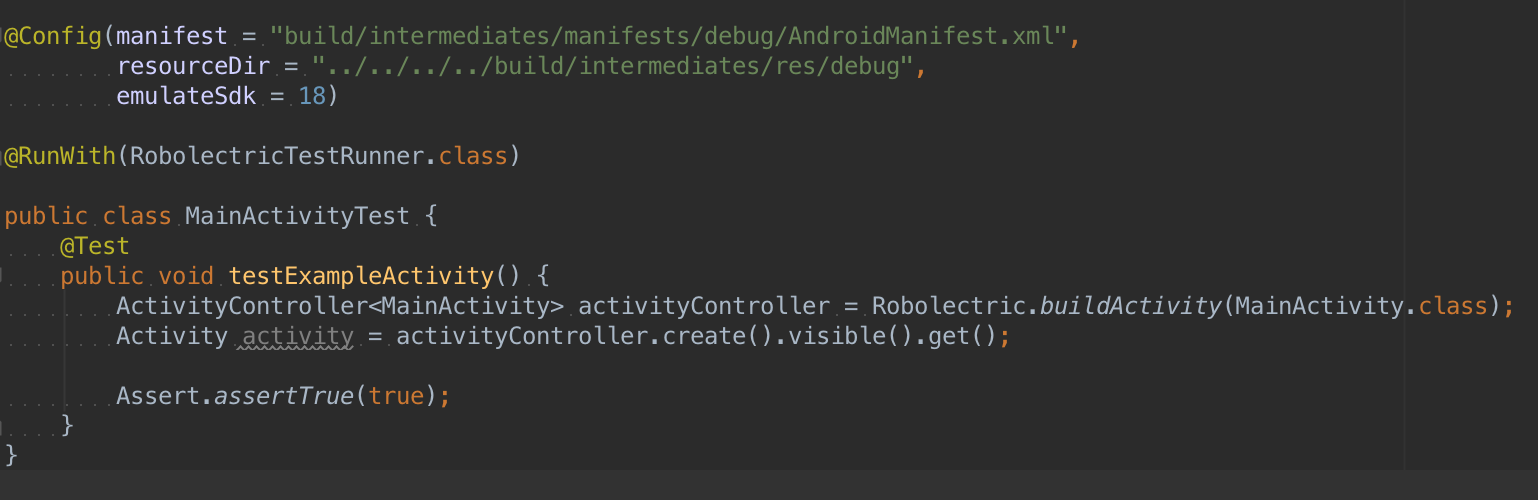
Create a MainActivityTest.java inside your src/androidTest/java folder. You want to force gradle to run with Robolectric. You will need to set a @Config option to emulate API 18, because this is the highest API Robolectric supports. You may also get a bug for Null Pointer Error for AndroidManifest.xml. There is an occasional error with how Robolectric currently references manifests, and the hack is to hardcode the debug manifest and resource directories using the @Config settings. I’ve included this below as well, but only add this to your code if you get the NPE error. Then you can write a quick dummy test that asserts true is true, so you can make sure everything is working.
There is currently no way to kick off Robolectric tests from Android Studio using the GUI (any GUI test stuff you see is for running regular JUnit tests). Navigate to your project in a terminal, and execute gradle test. In case you hadn’t noticed, you can toggle a window into a terminal for your project right inside Android Studio. Pretty handy!
Hopefully your tests passed! You can get more information about your test result status via app/build/test-report/index.html.
V4 SUPPORT LIB ISSUE
This was the strangest one to debug. I got everything up and running locally, but then Jenkins kept failing, saying that Robolectric needed the v4 support library. I spent a lot of time trying to figure out how to somehow command line download v4 to Jenkins as it spun up the Android Slave, to no avail.
I then suspected my issue might be due to the fact that I was explicitly excluding the v4 support lib from Play services in my build.gradle file. I was excluding it there, because otherwise v4 gets included in the project twice, which isn’t allowed. When I would remove the exclude, I got a failure locally of “Multiple dex files define Landroid/support/v4,” as expected. At this point I learned a very fancy gradle trick:
gradle -q dependencies
This prints out a neat visual representation of all dependencies in your project, and especially cool, it shows you how any ‘+’ versions got resolved. So this was handy, and indeed confirmed that I was including v4 twice.
Ultimately the solution I found was to continue exclude v4 from any compiled in libraries that needed it excluded. Then, re-include v4 in only in the case of testCompile, since that is when Robolectric needs it! It sure seems obvious now.
ASSETS NOT FOUND
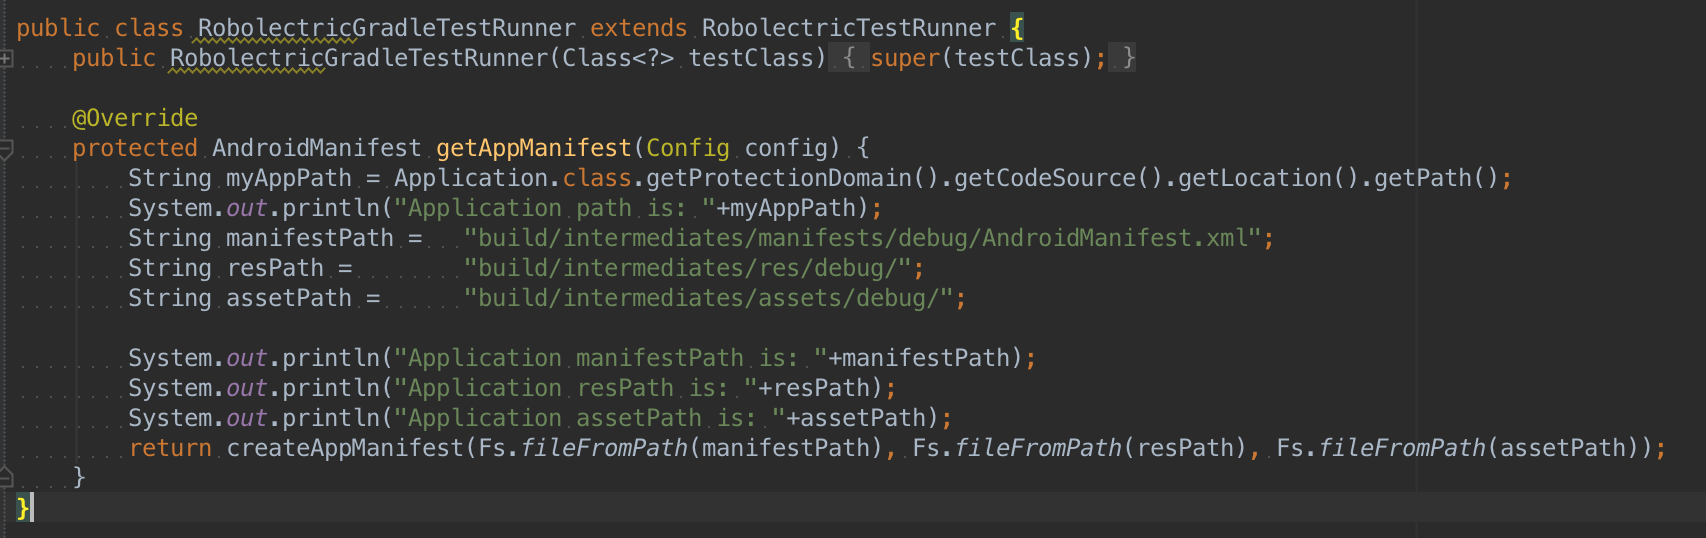
If you are hardcoding the location of resource directory and manifest via @Config, and get an error in your tests for Assets not found, you will need to extend the RobolectricTestRunner class with your own, and hardcode the asset directory. Back in the day, Robolectric had no @Config option, and inheriting from RobolectricTestRunner was the only way to set these options. Then they released a new version of Robolectric which allowed you to set common items via @Config. However, the assets directory is not one of those items. Here is how to do it the old fashioned way:
BYTE CODE ERROR w/ GOOGLE PLAY SERVICES
This issue is documented here and here. Basically Play Services v 5.0 obfuscated some code that Robolectric assumes it can access. The work around for this is to add -noverify to the jvmArgs attribute in gradle, with this handy code:
android {
...
...
tasks.whenTaskAdded { task ->
if (task.name == 'testDebug') {
task.jvmArgs '-noverify'
}
}
}
I had trouble with this one actually working, as you can see by my posts. I tried everything under the sun! Maddeningly, after a system reboot this gradle update allowed it to work. UGH.
So there you go! This was quite a journey to get all these pieces working together. I hope you find it useful. Please leave a comment if you have any questions!
*Current as of the writing of this blog post.